How to Change Door Knob Lock Position? A Step-by-Step Guide
Changing the orientation of a door knob lock from right-handed to left-handed, or vice versa, can be a useful skill for homeowners and renters alike. This simple DIY project allows you to adapt your door locks to your preferred hand orientation. This can enhance both convenience and security.
In this article, we’ll walk you through the steps to change the orientation of your door knob lock, explain why you might need to do it, offer pro tips to make the process easier, and address some frequently asked questions. So, let’s begin.

Why Change the Orientation of a Door Knob Lock?
Before you start, let’s first discuss when and why you should consider changing the orientation of a door knob lock.
Enhancing Convenience
One of the primary reasons for changing the orientation of a doorknob lock is to enhance convenience. If you find it more comfortable or ergonomic to use your non-dominant hand for locking and unlocking doors, switching the orientation of the lock can make daily tasks easier.
Meeting Personal Preferences
Personal preference plays a significant role in the orientation of door locks. Some people prefer left-handed locks, while others prefer right-handed locks. Changing the orientation allows you to customize your home to your liking.
Accommodating Household Members
In households with left-handed and right-handed individuals, changing the lock orientation can accommodate everyone’s preferences, making it easier for everyone to operate the door locks comfortably and efficiently.
Tools and Materials That You Will Need
Before you begin, gather the following tools and materials:
- Screwdriver (usually Phillips-head)
- Allen wrench or hex key (if applicable)
- Pencil or marker
Steps for Changing Door Knob Lock Position
Here’s a step-by-step guide that we made to make the process easier for you:
Step 1: Prepare the Door
Ensure that the door is in the closed position to facilitate the lock reorientation process.
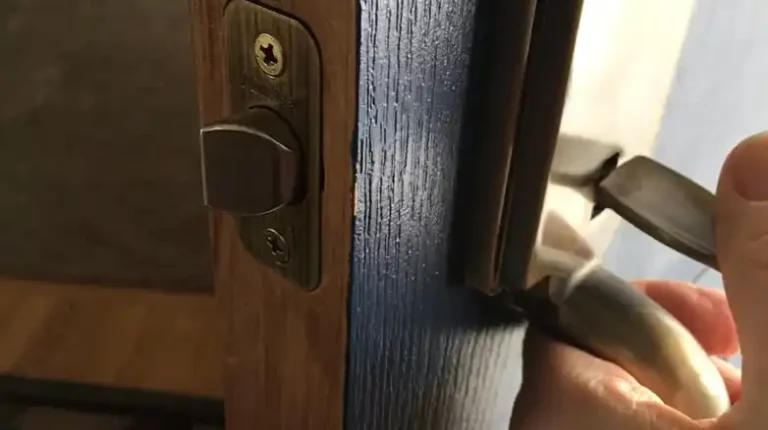
Step 2: Remove the Doorknob
Locate the screws or mounting plate on the interior side of the door knob. These screws are usually hidden beneath a cover or plate. Remove this cover to access the screws.
Step 3: Loosen and Remove the Screws
Use a screwdriver to loosen and remove the screws that secure the doorknob to the door. Keep track of these screws as you’ll need them later.
Step 4: Remove the Doorknob
Gently pull the doorknob assembly away from the door. Apply a bit of force, if necessary, but be cautious not to damage the door or the doorknob.
Step 5: Reverse the Orientation
Depending on the lockset design, you may need to disassemble the knob or latch mechanism to reverse it. This may involve removing a retaining plate, sliding out the latch assembly, or using an Allen wrench or hex key to detach and reposition the knob on the spindle. Consult the manufacturer’s instructions for your specific lockset if necessary.
Step 6: Reassemble the Lock
Once you’ve reversed the orientation of the lockset, reassemble it in the opposite direction. Ensure all components are properly aligned and secure.
Step 7: Reattach the Doorknob
Position the doorknob assembly back onto the door, making sure the spindle passes through the latch mechanism.
Step 8: Secure with Screws
Reattach the screws to the interior side of the doorknob assembly. Tighten them securely to hold the doorknob in place.
Step 9: Test the Lock
Turn the doorknob to ensure that the latch bolt extends and retracts smoothly. Check that the door locks and unlocks correctly.
Step 10: Reinstall Any Cover or Plate
If your doorknob has a cover or plate that conceals the screws, reattach it to the interior side of the doorknob.
Pro Tips for Change Door Knob Lock Position
Keep track of screws and parts: Place screws and small parts in a container or bag to avoid losing them during the process.
Consult the manufacturer’s instructions: If you encounter difficulties or have questions specific to your lockset, refer to the manufacturer’s instructions for guidance.
Lubricate the lock if it’s stiff: If your lock feels stiff after reassembly, consider applying a lubricant to ensure smooth operation.
Consider upgrading your lock: If you’re already changing the orientation, it might be an excellent time to upgrade to a more secure or modern lockset.
Be patient and gentle during disassembly: Avoid using excessive force when removing components to prevent damage to the lock or the door.
FAQs (Commonly Asked Door Knob Questions)
Can I change the orientation of any door knob lock?
Yes, you can change the orientation of most standard door knob locks. However, the process may vary slightly depending on the lock’s design and manufacturer.
Do I need any specialized tools or skills?
Basic tools like a screwdriver and possibly an Allen wrench or hex key are usually sufficient for this task. No specialized skills are required, but patience and attention to detail are essential.
Can I use this guide for exterior doors as well?
This guide is primarily intended for interior doors. Exterior doors may have more complex locksets, and changing their orientation might require additional steps or professional assistance.
How often should I maintain my doorknob locks?
Regular maintenance, such as lubricating the lock and cleaning the components, can extend the life of your door knob locks. Check your locks periodically and address any issues promptly to ensure they function correctly.
End Notes
Changing the orientation of a doorknob lock is a simple yet valuable DIY project that can enhance convenience and cater to personal preferences. By following the step-by-step guide provided here and keeping pro tips in mind, you can successfully reorient your door locks to align with your needs. If you encounter any challenges, don’t hesitate to consult a professional locksmith for assistance. With the right orientation, your door locks will provide both security and ease of use for years to come.
![[Explained] Can You Bend a Door Back into Shape?](https://doorsuggest.com/wp-content/uploads/2023/09/Can-You-Bend-a-Door-Back-into-Shape-768x431.webp)