How to Fill Gap Under Exterior Door Threshold | Steps Guideline
When it comes to home maintenance, some problems can be rather sneaky. One of those is the pesky gap under your exterior door threshold. You know the one – it lets in drafts, pests, and maybe even a puddle or two during a rainstorm. If you’re facing this issue, you’re not alone. But fear not!
Filling the gap under the exterior door threshold is a DIY kind of job and you can be the DIY master if you want. The process is very easy, you can use mortar mixture or caulk to fill the gap quite easily!
In this comprehensive guide, we’ll walk you through various methods to solve this problem and keep your home cozy and pest-free.

The Solution for Filling the Gap Under Your Exterior Door Threshold
So, what’s the solution It’s simple fill that gap! By doing so, you’ll not only keep pests and drafts at bay but also improve the overall appearance of your home. Plus, you’ll save money on your energy bills in the long run. Now, let’s dive into the methods for filling the gap under your exterior door threshold, so you can choose the one that suits your DIY skills and budget.
Method 1 – Fill the Gap with Silicon Caulk
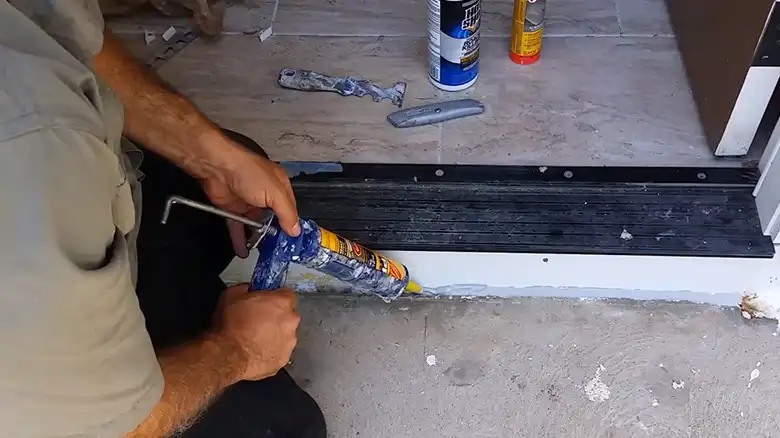
Silicon caulk is your go-to superhero when it comes to sealing gaps under your exterior door threshold. This flexible, weather-resistant material adheres like a champ and keeps drafts and pests at bay.
Materials and Tools Needed for the Job
Before you roll up your sleeves, make sure you have the following materials and tools on hand –
Materials
- Silicone caulk
- Caulk gun
- Caulk smoother or a putty knife
- Painter’s tape
Tools
- Utility knife
- Wire brush
Now, let’s get to work!
Step 1 – Clean the Gap
Start by removing any debris, dirt, or old caulk from the gap under your exterior door threshold. A wire brush can be handy for this task.
Step 2 – Apply Painter’s Tape
To keep your lines clean and prevent any caulk from spilling over, apply painter’s tape to both sides of the gap, leaving a small space where you’ll apply the caulk.
Step 3 – Caulk It Up
Load your caulk gun with silicone caulk and begin applying a steady bead of caulk along the gap. Make sure it fills the entire space and is smooth.
Step 4 – Smooth It Out
Using a caulk smoother or a putty knife, smooth out the caulk to ensure it’s level with the threshold.
Step 5 – Remove Excess
Before the caulk dries, carefully remove the painter’s tape to reveal clean lines. Any excess caulk can be trimmed with a utility knife.
Step 6 – Let It Dry
Allow the caulk to dry completely according to the manufacturer’s instructions.
Congratulations! You’ve successfully filled the gap under your exterior door threshold with silicone caulk. This method provides a flexible seal that will keep pests and drafts out.
Method 2 – Fill the Gap with Mortar Mix
Mortar mix is your heavyweight champion, perfect for filling larger gaps under your exterior door threshold. It’s durable and can withstand the elements.
Materials and Tools Needed for the Job
If you prefer a more solid approach, here’s what you’ll need
Materials
- Mortar mix
- Water
- Bonding agent (optional)
- Masking tape
Tools
- Trowel
- Mixing bucket
- Gloves
Let’s get started!
Step 1 – Prepare the Gap
Clean the gap under your exterior door threshold, removing any dirt or debris.
Step 2 – Apply Bonding Agent (Optional)
If your threshold is particularly porous or you want extra adhesion, consider applying a bonding agent to the gap and allowing it to dry as per the manufacturer’s instructions.
Step 3 – Mix the Mortar
In your mixing bucket, combine the mortar mix with water according to the manufacturer’s guidelines. Mix until you achieve a thick, paste-like consistency.
Step 4 – Apply the Mortar
Use a trowel to press the mortar mix firmly into the gap under the threshold. Make sure it’s level with the threshold surface.
Step 5 – Smooth It Out
Smooth the mortar with the trowel, ensuring a clean finish.
Step 6 – Tape It Off
Apply masking tape to the surrounding areas to keep them clean while the mortar dries.
Step 7 – Let It Cure
Allow the mortar to cure for the recommended time, typically 24 to 48 hours, depending on the product.
By using mortar mix, you’ve created a durable and long-lasting seal beneath your exterior door threshold. This method is especially effective for gaps that need a sturdier solution.
Frequently Asked Questions
Can I use any type of caulk to fill under the gap?
No, you can’t. It’s best to use silicone caulk, as it provides excellent flexibility and weather resistance. Avoid using acrylic caulk, as it may not hold up as well over time.
How do I know if I should use a bonding agent?
If your threshold is made of a highly porous material like natural stone, using a bonding agent is advisable for better adhesion of the mortar mix.
Can I paint over the mortar mix used?
Yes, once the mortar mix has fully cured, you can paint it to match your door threshold or the surrounding area.
Can I use treated wood to fill the gap?
Well, it will depend on the gap under the door threshold. If the surface beneath the door is uneven and the gap is lower than 0.5” then it can’t be used.
Bonus Tips – Why Filling the Gap Under Exterior Door Threshold
Before we dive into the nitty-gritty of filling that gap, let’s understand the challenges it presents. This gap under your exterior door threshold can lead to several issues:
- Energy Loss: The gap allows heat or cool air to escape, leading to higher energy bills.
- Pests and Moisture: Small critters and moisture can easily find their way inside, causing damage and discomfort.
- Safety Concerns: The gap poses a tripping hazard, potentially leading to accidents.
- Aesthetic Woes: It just doesn’t look good, does it? Your threshold should be flush with the floor.
Conclusion
Filling the gap under your exterior door threshold is a DIY project that not only enhances the appearance of your home but also improves its energy efficiency and keeps unwanted guests out. Whether you choose silicone caulk for flexibility or mortar mix for durability, the key is to follow the steps carefully for a successful outcome. If you have any additional questions or need further guidance on this topic, please don’t hesitate to leave a comment below. We’re here to help! Thank you for reading, and best wishes for your DIY project!


![[Explained] Do Door Knobs Come with Strike Plates?](https://doorsuggest.com/wp-content/uploads/2023/10/Do-Door-Knobs-Come-with-Strike-Plates-768x431.webp)
![[Just 5 Steps] How to Measure for a Security Door?](https://doorsuggest.com/wp-content/uploads/2023/10/How-to-Measure-for-a-Security-Door-768x431.webp)
