How to Make Door Frame Smaller? A Step-by-Step Guide
Resizing a door frame might not be your typical weekend project, but sometimes life throws us curveballs. Maybe you’ve inherited a door frame that feels more like an entrance to Narnia than your living room. Or perhaps that antique door frame you fell in love with at a flea market needs some TLC to fit into your home. Whatever your reason, this step-by-step guide will walk you through the process of making your door frame smaller.
The Importance of Proper Measurements
Imagine crafting a perfectly sized door frame in your mind, only to find out it doesn’t quite match up in reality. Proper measurements are the backbone of this project. Without them, you’re essentially wandering in the DIY wilderness without a compass. So, before you grab your tools, make sure you’ve got your measurements spot-on.
Procedure for Making Door Frames Smaller
Resizing a door frame may become necessary as you embark on home improvement or renovation projects. Understanding how to make a door frame smaller is a valuable skill that can enhance the functionality and aesthetics of your living space. Here’s a step-by-step guide to help you through the process.
Tools and Materials Needed
Let’s start by assembling your arsenal. Here’s what you’ll need –
List of Required Tools
- Tape measure
- Circular saw
- Chisel
- Screwdriver
- Hammer
- Carpenter’s square
- Safety goggles
- Ear protection
Necessary Materials for the Project
- New door
- Lumber
- Sandpaper
- Wood filler
- Paint or stain
- Screws and nails
Safety Precautions
Safety first, folks. You’re about to embark on a project that involves power tools and sharp objects. Here’s how to stay safe:
Protecting Yourself During the Process
- Wear safety goggles and ear protection.
- Avoid loose clothing and jewelry.
- Keep your workspace well-lit.
Safety Gear and Equipment
- Fire extinguisher
- First aid kit
- Ventilation mask (if working with paints or stains)
Now that you’re geared up, let’s get down to the nitty-gritty of resizing that door frame.
Step 1: Prepare the Work Area
The last thing you want is to trip over your own shoelaces while wielding a circular saw. Clear the space around the door, and ensure you have plenty of room to move around.
Clearing the Space Around the Door
Remove any obstacles, furniture, or decorations near the door. Creating a clear path will make your work easier and safer.
Creating a Safe and Organized Workspace
Set up a workbench or table with your tools and materials within easy reach. The organization will save you time and frustration.
Step 2: Remove the Door and Hardware
Before you can resize the frame, the door needs to go. Here’s how –
Taking the Door off Its Hinges
Open the door and support it with a sturdy object. Then remove the hinge pins using a screwdriver and hammer.
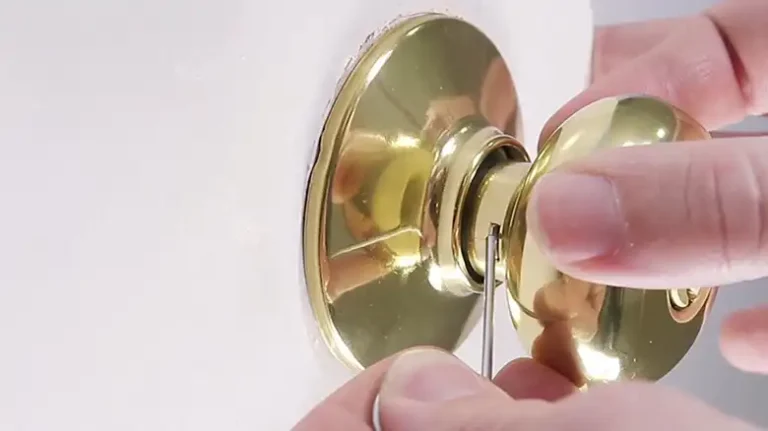
Removing Door Hardware and Accessories
Take off the doorknob, latch, and any other hardware. You want to work with a bare frame.
Step 3: Measure and Mark
Now, the moment of truth—measuring and marking the door frame to fit your needs.
Accurate Measurements for the New Frame Size
Use your tape measure to determine the new dimensions. Measure twice, cut once, as the old saying goes. Make precise marks where you need to make adjustments.
Marking the Areas to Be Cut or Adjusted
Clearly mark the areas you’ll be cutting or adjusting. This will serve as your guide during the next steps.
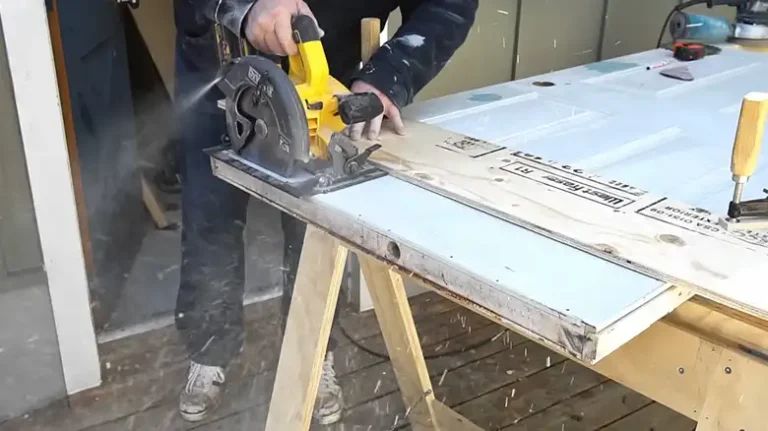
Step 4: Cut the Frame
Time to bring out the big guns, aka the circular saw.
Using the Right Tools for Cutting
Set your circular saw to the right depth and carefully cut along the marked lines. Keep your hands steady and your eyes focused.
Carefully Trimming the Door Frame to the Desired Size
Take your time with this step. It’s all about precision.
Now that we’ve trimmed the frame, let’s move on to the next steps in our door frame resizing adventure.
Step 5: Adjust the Jamb
With the frame cut, it’s time to make adjustments to the door jamb.
Making Necessary Adjustments to the Door Jamb
Chisel away any excess wood and ensure a snug fit for your resized frame.
Ensuring a Snug Fit for the Resized Frame
Test the fit of the frame to ensure it matches your measurements perfectly. A snug fit is what you’re aiming for.
Step 6: Refinish and Paint
With the frame fitting like a glove, it’s time to give it a polished look.
Preparing the Frame for Finishing
Sand the frame to remove any rough edges or imperfections. Fill any gaps or holes with wood filler.
Applying Paint or Stain to Match the Interior
Choose a paint or stain that complements your interior décor. Apply it evenly and allow it to dry.
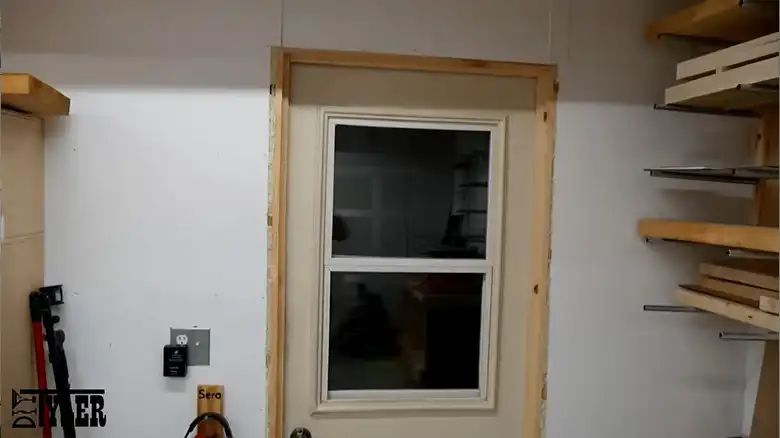
Step 7: Reinstall the Door
Now that your frame is looking sharp, it’s time to hang the door back in place.
Hanging the Door Back on Its Hinges
Carefully reattach the door to its hinges. Make sure it swings smoothly.
Reattaching Hardware and Accessories
Put the doorknob, latch, and any other hardware back in their rightful places.
Step 8: Test and Inspect
Before you kick back and admire your handiwork, there’s one more crucial step.
Checking for Proper Functionality
Open and close the door multiple times to ensure it works perfectly. No squeaks, no jams, just smooth operation.
Ensuring the Door Closes Securely
Check that the door seals properly when closed. No one wants drafts or peeping toms!
Maintenance Tips
Congratulations, you’ve successfully resized your door frame! Here are some tips to ensure it stands the test of time –
- Regularly check for any cracks or gaps.
- Keep the frame clean and dust-free.
- Apply a fresh coat of paint or stain when needed.
Relevant Questions
Why would I need to make my door frame smaller?
Resizing a door frame is often necessary when you want to fit a new door or adapt your space. It could be due to a home renovation, a change in door size, or simply optimizing your living area.
What tools do I need for this project?
You’ll need essential tools like a tape measure, circular saw, chisel, screwdriver, hammer, carpenter’s square, safety goggles, and ear protection. The specific tools may vary based on your project’s complexity.
Is it possible to make a door frame larger instead of smaller?
While it’s generally easier to make a door frame smaller, enlarging one can be done. However, it’s a more complex task that might involve structural changes to accommodate a larger frame.
Can I hire a professional for this task?
Yes, you can hire a professional carpenter or handyman to resize your door frame. This can be a good option if you’re not confident in your DIY skills or if the project is complex.
How long does it typically take to resize a door frame?
The time required depends on factors like your experience, the complexity of the project, and the tools you have. A straightforward resizing project may take a day or two, while more intricate work could take longer.
What safety precautions should I take when working on door frames?
Prioritize safety by wearing safety goggles and ear protection, avoiding loose clothing and jewelry, and ensuring good lighting. Additionally, having a fire extinguisher and a first aid kit nearby is a wise precaution.
Do I need any prior experience to resize a door frame?
While prior DIY experience is beneficial, resizing a door frame is achievable for beginners with patience and attention to detail. Follow the steps carefully, and don’t hesitate to seek help if needed.
Can I resize exterior door frames as well?
Yes, you can resize both interior and exterior door frames using similar techniques. However, exterior frames may require additional weatherproofing measures.
What are the most common mistakes to avoid during resizing?
Common errors include rushing through measurements, neglecting safety gear, and not preparing the workspace adequately. Careful planning and attention to detail can help you avoid these pitfalls.
Is it possible to resize a metal door frame?
Resizing a metal door frame can be more challenging than resizing a wooden one due to the material’s rigidity. It may require specialized tools and skills, so consider seeking professional assistance if dealing with metal frames.
Conclusion
You’ve made it! Resizing a door frame may seem like a daunting task, but armed with the right tools and knowledge, it’s a manageable DIY project. Remember, careful measurements, precision cutting, and attention to detail are your best friends in this endeavor. In the end, you’ll not only have a perfectly fitting door frame but also the satisfaction of a job well done. So, go ahead, enjoy your newly adjusted door frame, and revel in the sense of accomplishment that comes with conquering a DIY challenge.
If you have any questions or need further guidance on door frame resizing, please don’t hesitate to leave a comment below. We’re here to help you every step of the way. Thank you for reading, and best of luck with your home improvement projects!