How to Shave Down a Door | Your Ultimate Guide
Let’s talk about doors. They’re these amazing inventions that keep the outside world at bay and provide us with privacy and security. But what happens when your door decides to misbehave? It might start sticking, refusing to close, or just being downright obstinate. That’s where the art of shaving down a door comes into play.
Therefore, make this convenient, we’re here with a comprehensive guide on how to shave down your door accordingly. In this post, we’ll explore the world of door shaving, addressing common challenges, and providing step-by-step instructions. So, if you’ve ever wondered how to shave down a door, you’re in the right place!

The Door Dilemma
Current Challenges
Just imagine — You’re rushing to leave for work, but your front door seems to have a vendetta against you. It simply won’t budge. Or maybe you’re remodeling your home, and the new carpet you installed makes your bedroom door scrape the floor like a DJ scratching a record. These are the everyday struggles faced by homeowners dealing with ill-fitting doors. But fret not, for we’re about to unlock the secrets of door shaving.
A Quick Answer
In a nutshell, shaving down a door involves removing a small portion of its material to ensure a smoother and more precise fit within the door frame. It’s a handy DIY skill that can save you money on hiring a professional carpenter. So, if your door is misbehaving, and you’re wondering how to make it behave, the solution is simple, learn how to shave it down.
Now, let’s get deeper into the process.
How Do You Shave Down a Door?
Shaving down a door might sound like a job for a skilled carpenter, but with the right guidance, you can tackle this DIY project like a pro. Here’s a step-by-step breakdown of how to shave down a door –
Step 1. Gather Your Tools
Before you start hacking away at your door, assemble the necessary tools. You’ll need a plane, a rasp, sandpaper, a saw, a chisel, a straightedge, and safety gear (goggles and gloves).
Step 2. Remove the Door
Take the door off its hinges to make it easier to work on. Lay it flat on a sturdy surface, preferably with a workbench or sawhorse.
Step 3. Mark the High Spots
Identify the areas of the door that are causing the problem. These are the high spots where the door is rubbing or sticking. Mark them with a pencil.
Step 4. Start Shaving
Using your chosen tool (plane, rasp, or chisel), gently shave off the marked high spots. Take your time and check the fit frequently to avoid over-shaving.
Step 5. Smooth It Out
Once you’ve achieved a better fit, sand the shaved areas to ensure a smooth finish. This step also helps remove any rough edges.
Step 6. Rehang the Door
Put the door back on its hinges and test it. If it closes smoothly without sticking or scraping, congratulations, you’ve successfully shaved down your door!
That’s it!
Relevant Questions
Can I shave down a hollow-core door?
Yes, you can shave down a hollow-core door, but it requires extra care. Ensure that you don’t shave too much, as it can compromise the door’s structural integrity.
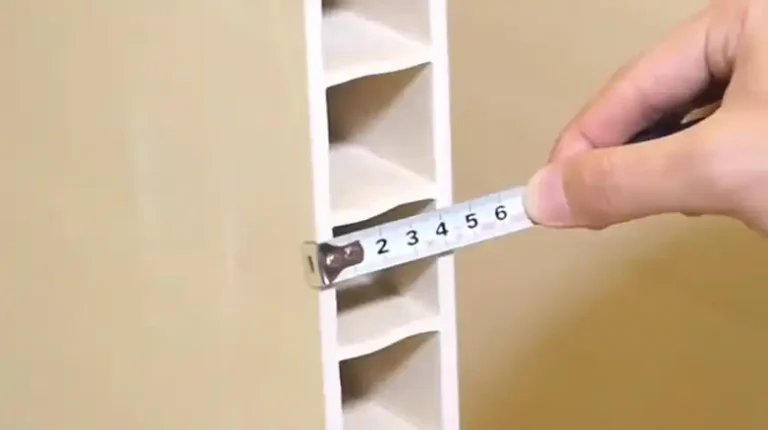
What’s the ideal clearance for a door in its frame?
A gap of 1/8 to 1/4 inch between the door and frame is usually sufficient for proper clearance without compromising security or insulation.
Do I need to repaint or refinish the door after shaving it down?
It’s a good idea to touch up the finish after shaving down a door to maintain its appearance and protection.
Can I shave down a metal door?
Shaving a metal door requires specialized tools and skills, so it’s best left to professionals.
Are there any alternatives to door shaving?
If shaving down the door seems too daunting, consider installing hinge shims or adjusting the strike plate for a temporary fix.
End Note
There you have it! You’re now equipped with the knowledge of how to shave down a door and make it behave like a well-trained butler. Remember, this DIY project may require some patience and practice, but the satisfaction of a smoothly closing door is worth the effort.
If you have any more questions or need further guidance, don’t hesitate to leave a comment below. We’re here to assist you on your journey to door perfection. Happy door-shaving, and may your entryways always open with grace and ease. Thanks for reading, and best wishes for all your DIY endeavors!
![[Explained] How to Keep Barn Door from Jumping Off Track?](https://doorsuggest.com/wp-content/uploads/2023/10/How-to-Keep-Barn-Door-from-Jumping-Off-Track-768x431.webp)